Get started with Sistine
Let's build a simple static site with Sistine, from installation to deploy.
Install Sistine
This guide will show a lot of shell commands in code blocks. Whenever you see a line beginning with a $, it represents a command you need to type into your shell (except the leading $); other lines represent output, which might not match what you see exactly, but should be close enough to guide you.
Prerequisite: install Ink
Sistine is written in the Ink programming language. If you don't have Ink on your system, you'll need to install it from a release on GitHub. Sistine works on Ink releases v0.1.9 and up -- you can check the version of Ink you have by running ink --version.
$ ink --version
ink v0.1.9
Get Sistine from source
Sistine currently doesn't have a simple installation method. We'll have to clone the source repository and run the program from the repository.
$ git clone https://github.com/thesephist/sistine
Cloning into 'sistine'...
remote: Enumerating objects: 207, done.
remote: Counting objects: 100% (207/207), done.
remote: Compressing objects: 100% (103/103), done.
Receiving objects: 100% (207/207), 50.59 KiB | 2.66 MiB/s, done.
remote: Total 207 (delta 85), reused 186 (delta 68), pack-reused 0
Resolving deltas: 100% (85/85), done.
Once you have Ink installed in your $PATH and Sistine cloned, run ./sistine help to check that it runs correctly.
$ cd sistine

$ ./sistine help
Sistine is a static site generator.

Quick start
    1. Place your Markdown content in content/
    2. Add some templates to tpl/
    3. Add your static assets to static/
    4. Add a config.json with your site settings
    5. Run `sistine` to build the site

    More documentation at github.com/thesephist/sistine.

Commands
    build    build the current site
    help    show this help message

Sistine is a project by @thesephist built with Ink.
If you see this help menu, you have a copy of Sistine on your system!
I usually add the Sistine repo to my $PATH or symlink a sistine command from my path to the executable in the repository, so I can run Sistine from anywhere on my computer with the sistine command.
Set up a project
Let's set up a basic Hello World blog with Sistine in a new directory.
# create and enter a new directory for our blog site
$ mkdir my-blog && cd my-blog
If you try to run a Sistine build in an empty repository, you'll get this error message:
$ sistine build
[sistine] error listing directory contents in dir(), open ./static: no such file or directory
[sistine] could not read the configuration file
Sistine looks for static files to copy from ./static and a configuration file to start building site contents, so let's create those two, then re-run Sistine.
$ mkdir static
$ echo '{ "name": "My blog", "origin": "https://example.com" }' > config.json

$ sistine build
[sistine] could not read content dir "./content"
[sistine] could not read rss template "./tpl/rss.xml"
Sistine looks for Markdown files to publish in ./content, and an (empty) RSS feed template in ./tpl/rss.xml. Let's create those two, as well as a folder for our templates at ./tpl. Then we re-run Sistine.
$ mkdir content tpl
$ touch ./tpl/rss.xml

$ sistine
[sistine] rss --( /rss.xml )-> /index.xml
This is our first successful build!
The output from the sistine command (which is equivalent to sistine build) tells us it rendered an RSS feed with the /rss.xml template, to /index.xml. We'll see more output like this once we start rendering real pages to our website.
Add a content page
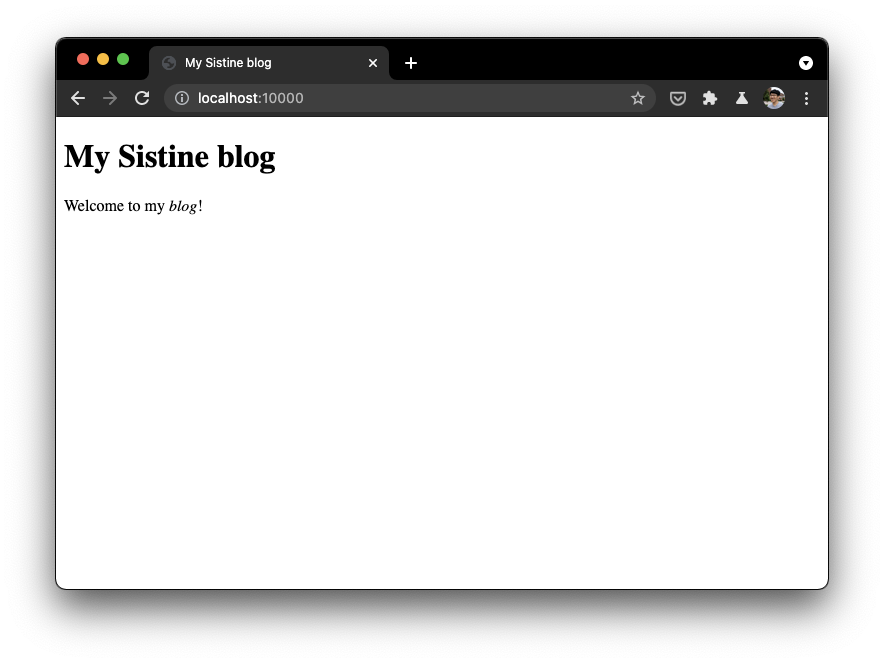
Let's add a content page for the home page of our site, at content/index.md. The file will have some metadata, and contain some Markdown, like this.
---
title: My Sistine blog
date: 2021-05-22
draft: true
---

Welcome to my _blog_!
We'll also have to add a template for our first, page -- otherwise, Sistine will tell us it couldn't resolve template for "/index.md". Our template will look like this, and be placed in tpl/index.html.
<!doctype html>

<title>{{ page.title }}</title>

<body>
    <h1>{{ page.title }}</h1>
    {{ page.content }}
</body>
This template represents a minimal HTML page with a title from the page's title field, a header with the page title, and the compiled Markdown contents of this page.
Preview your site
Let's now build this site, and serve it so we can preview our work so far! Sistine builds the static site into ./public, which we can serve with Python's built-in HTTP server if you have Python installed.
$ sistine
[sistine] rss --( /rss.xml )-> /index.xml
[sistine] /index.md --( /index.html )-> /

$ python3 -m http.server 10000 --directory ./public
Serving HTTP on :: port 10000 (http://[::]:10000/) ...
If you open your browser to localhost:10000, you should see your content file rendered through your template!
Customize
Let's add a little more to this example site by adding a post, and updating some template styles.
Custom templates
One customization we might make is to show a special warning message on content pages that are marked as draft: true. We can do this by modifying our tpl/index.html template.
<!doctype html>

<title>{{ page.title }}</title>

<body>
    <h1>{{ page.title }}</h1>
    {{ if page.draft }}
        <em>This post is a draft!</em>
    {{ end }}
    {{ page.content }}
</body>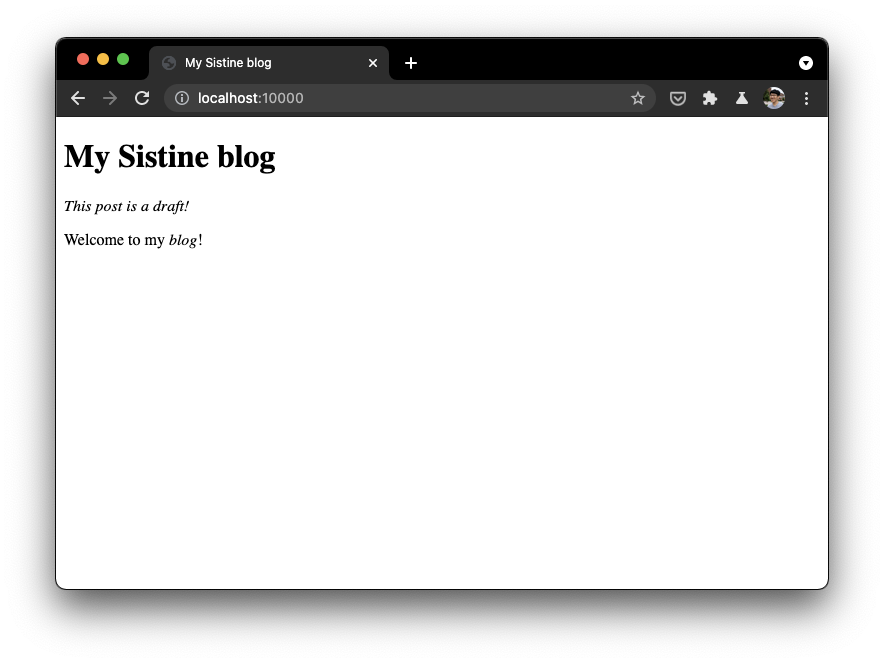
Adding pages
Adding another page, for example an "about" page, is as simple as creating another Markdown file in ./content. Let's create ./content/about.md
---
title: About me
date: 2021-05-22
draft: false
---

Hi! My name is **Linus**.
On the homepage, we may want to show a link to all the other pages on (the top level of) the blog. We can do this by looping through each item in page.pages in the tpl/index.html template, like this:
<!doctype html>

<title>{{ page.title }}</title>

<body>
    <h1>{{ page.title }}</h1>
    {{ if page.draft }}
        <em>This post is a draft!</em>
    {{ end }}
    {{ page.content }}

    {{ each page.pages by date desc }}
        <p><a href="{{ path }}">{{ title }}</a></p>
    {{ end }}
</body>
Here, we loop through each page in the children pages of the current (home) page, by descending order of dates, and render a link to each post. If we build and refresh the browser, we'll see a link to an about page, which leads us to an about page when we click on it.
$ sistine build
[sistine] rss --( /rss.xml )-> /index.xml
[sistine] /index.md --( /index.html )-> /
[sistine] /about.md --( /index.html )-> /about/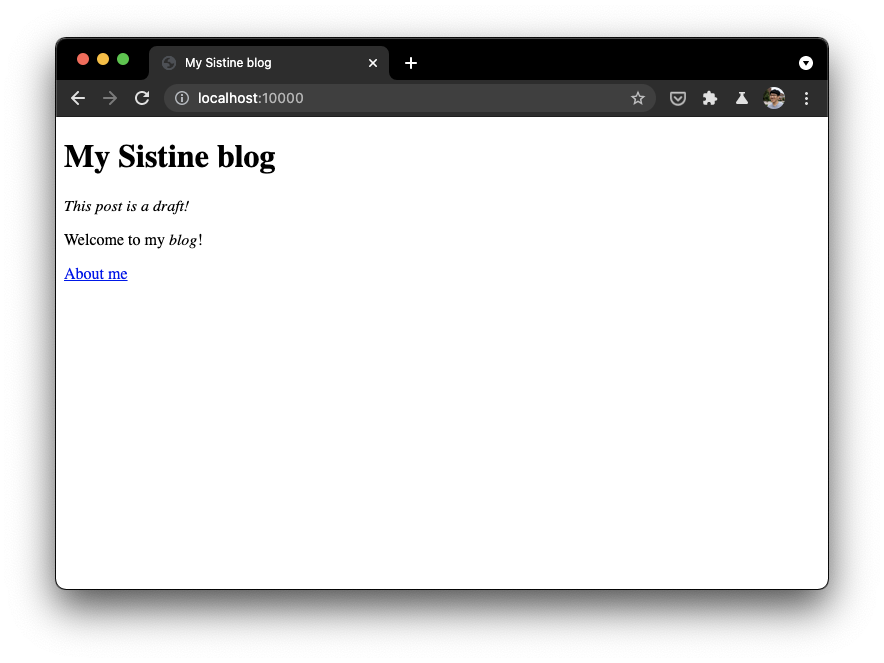
Adding static files
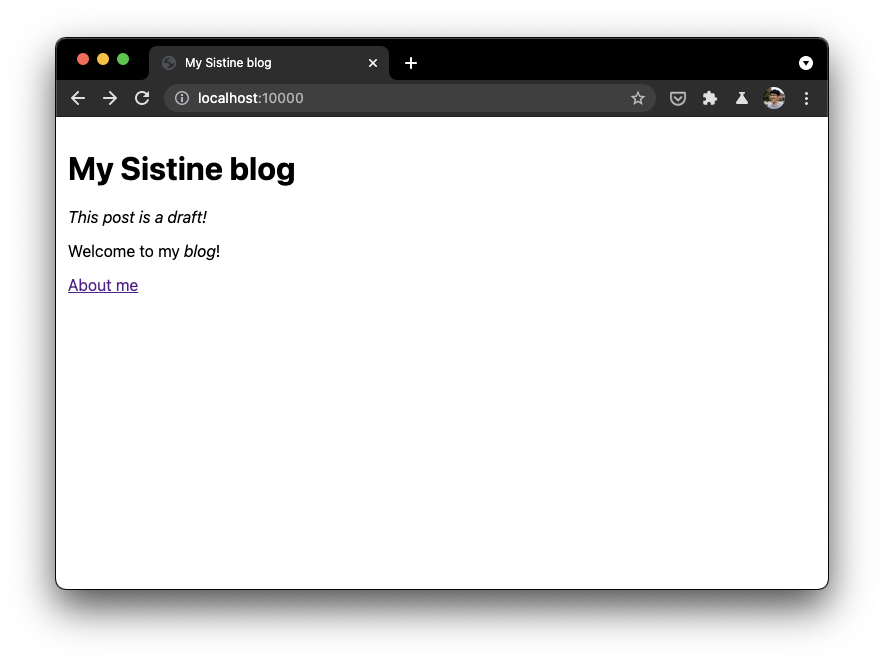
To add some styles to our blog, we need to create and include a style link tag. Rather than keep adding to our single template, let's split off the <head> part of our templates into a partial template so we can reuse it in other templates. To do this, we can create a ./tpl/parts/head.html like the following
<head>
    <title>{{ page.title }}</title>
    <link rel="stylesheet" href="/css/main.css">
</head>
Back in our main template, we can include this partial template with the partial template syntax, like {{ -- head -- }}.
<!doctype html>

{{ -- head -- }}

<body>
    <h1>{{ page.title }}</h1>

[...]
Lastly, we create a basic stylesheet at ./static/css/main.css
body {
    font-family: system-ui, sans-serif;
    margin: 2em auto;
    max-width: 800px;
    width: calc(100% - 24px);
}
If we build with sistine build once again and refresh our browser, we'll see that our CSS stylesheet is being loaded.
Deploy & next steps
Once you have a static site built, you'll want to deploy it somewhere. I've found Vercel, GitHub pages, and Netlify all excellent for hosting static sites and automatically deploying them from within a GitHub repository.
For more examples on how to build a non-trivial site with Sistine, this documentation website is open source on GitHub, from the content to the template and stylesheets. And of course, detailed documentation on template directives and the rest of Sistine is available in other pages in the documentation section of this site.